

- Step 1: connect the MikroTik to the AP in station mode and get an address via DHCP.
- Step 2: use your browser’s DevTools to capture the portal login form’s URL and fields.
- Step 3: put the POST request into a cp-login script using /tool fetch.
- Step 4: a scheduled cp-check script catches the portal and re-runs the login.
Diagnosis: MikroTik connected to Wi-Fi, but there’s no internet
Automatic MikroTik authorization on an access point is needed in one specific scenario. You set up a router as a client on someone else’s Wi-Fi. Status is green, you got an address, the gateway pings. But sites don’t load. Sound familiar?
What’s actually happening: you’ve hit a captive portal. The access point let you onto the network, but it’ll only hand over internet access after someone enters a login on a web page. A laptop opens that page on its own. A router has no browser, so it just sits there with no internet and stays silent.
There’s a second version of the same diagnosis: you logged in manually from a laptop behind the MikroTik, everything worked for three days, then the session expired. Or the hotel rebooted its controller overnight. Or your router had a power blip. And once again someone has to grab a laptop and click “Log in”. For a site with a camera, a sensor, or a terminal with no one around, that’s not an option.
Here’s what you’ll get at the end. The router will figure out on its own that it’s stuck behind a portal, send the login form itself, and repeat the process after a reboot. The log will show when and why it logged in.
| Parameter | Value |
|---|---|
| Setup time | 20-40 minutes, most of it spent figuring out the portal’s form |
| Level | Confident RouterOS user, comfortable with terminal and WinBox |
| What you need | MikroTik with Wi-Fi, portal credentials, a laptop with a browser |
| Where commands run | MikroTik client terminal and a browser on your workstation |
Let’s agree on terms first, to avoid confusion. MikroTik client: your router, the one connecting to someone else’s Wi-Fi. Foreign AP: the access point belonging to a hotel, business center, or provider. Workstation: a laptop with a browser, where you inspect the login form. Every code block is labeled with where to run it. Don’t mix those up, half your success depends on it.
In this article we’ll cover:
- why MikroTik doesn’t pass web authorization on its own and what’s stopping it;
- how to pull the exact login form request out of the browser;
- cp-login and cp-check scripts for RouterOS 7 with logging and error handling;
- portals using tokens, MAC addresses, and cookies in the request;
- WPA2-Enterprise as an alternative to web login, where no script is needed at all;
- securing a router that’s sitting exposed on someone else’s network;
- troubleshooting common fetch errors and FAQ.
How the scheme works
Look at the diagram before diving into the terminal. The whole trick is that the router does exactly what a browser does when you click “Log in”, just without the browser.
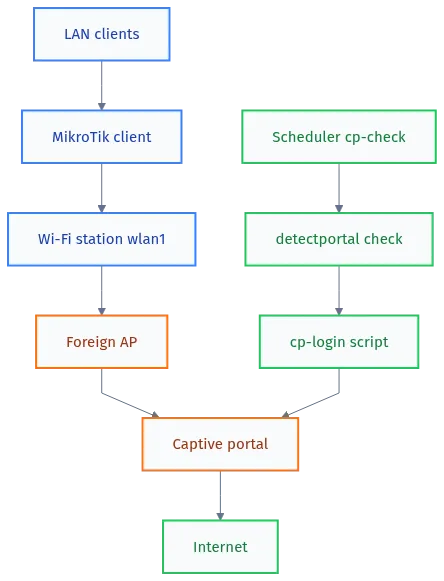
Blue is your side. Orange is someone else’s infrastructure, which you don’t control. Green is what we’ll build today. The portal sees the MAC and IP of your MikroTik specifically, so once it’s logged in, all LAN clients behind NAT get internet access.
Why MikroTik doesn’t log into the access point on its own
There are several reasons, and they stack on top of each other. Let’s go through each one, since it determines which solution fits your case.
| Reason | Why it breaks things | What to do |
|---|---|---|
| Captive portal on a web page | The portal expects an HTTP request with login credentials. The router has no browser, so no one sends that request | Replay the POST via /tool fetch |
| Portal session expires | The portal drops the client after 24 hours, a week, or an idle timeout | Periodic check and re-login |
| Wi-Fi reconnect or reboot | Many portals reset the session on a new association or a new DHCP lease | Check on startup via scheduler |
| Dynamic fields in the form | Token, MAC, IP, gw_id change every time, so a static request stops working | Parse the portal page before logging in |
| WPA2-Enterprise instead of a portal | The access point requires login at the 802.1X level, no EAP settings means no association at all | Set EAP in the security profile |
| Router’s DNS isn’t the portal’s own | A static 1.1.1.1 won’t resolve the portal’s internal names | use-peer-dns=yes or a static record |
| Login via JavaScript and CHAP | The password gets hashed in the browser, so a plain POST won’t send it | Look for a PAP login option or another method |
The trickiest one here is the second row. You set it up, tested it, left. A day later the portal drops the session, and you find out from a client’s phone call. So a one-time login without a scheduled check isn’t a solution, it’s a delayed incident.
The last row rules out some portals entirely. If the form computes an MD5 of the password in the browser via JavaScript, as MikroTik Hotspot does in CHAP mode, a plain POST won’t get you in. We’ll cover that in the troubleshooting section too.
A separate note on WPA2-Enterprise. If connecting to the network makes your laptop ask for a login and password in a system Windows dialog, not a web page, that’s 802.1X, and the whole fetch section doesn’t apply to you. Jump straight to the alternatives section, there are three commands waiting there.
How to tell the authorization type in a minute
Connect to the network with a laptop and watch what happens. This is the main branch point of the whole article.
| What you see on the laptop | Type | MikroTik solution |
|---|---|---|
| Open network, then a web login page pops up | Captive portal | Fetch script, the main recipe |
| WPA2-protected network, still shows a web page | PSK plus captive portal | Password in security plus a fetch script |
| System login/password dialog before connecting | WPA2-Enterprise, 802.1X | EAP PEAP in the security profile |
| A page with an “Accept terms” button, no login | Click-through portal | Fetch script, even simpler form |
System requirements
| Component | Version | Comment |
|---|---|---|
| RouterOS | 7.x, stable or long-term branch | Scripts are written for v7, the /tool fetch as-value syntax also works on later 6.x |
| Wi-Fi package | wireless or wifi | Older hAP and RB951 devices run wireless, newer ax models run wifi |
| Hardware | Any MikroTik with a Wi-Fi module | hAP lite, hAP ac2, hAP ax2, SXT, LHG, cAP |
| Workstation | Any browser with DevTools | Chrome, Firefox, Edge, all work fine |
| Credentials | Login and password for the portal or 802.1X | Your own, issued by the network administrator |
At the time of publication, the current stable branch is RouterOS 7.23.x and the long-term branch is 7.21.x, according to endoflife.date. Check the latest releases at mikrotik.com/download before installing.
Port table
The router will only reach out via HTTP and HTTPS. We don’t need any incoming connections from the foreign AP’s side at all, and we’ll close those off below.
| Port | Protocol | Purpose | Exposed externally? |
|---|---|---|---|
| 80 | TCP, outbound | detectportal check and HTTP portal | No, outbound only |
| 443 | TCP, outbound | HTTPS portal login | No, outbound only |
| 53 | UDP/TCP, outbound | DNS to the portal’s server | No |
| 67-68 | UDP | DHCP client on wlan1 | Only exchange with the foreign network’s DHCP |
| 8291 | TCP | WinBox | No, LAN only |
| 22 | TCP | SSH | No, LAN only |
Preparation
Check three things before configuring anything. First, the RouterOS version and which Wi-Fi package you have. The command syntax in the next step depends on it.
Where to run this: MikroTik client terminal.
/system resource print
/system package print
/interface print where type~"wlan|wifi"
Result: in the first command, check the version line. In the second, look for the wireless or wifi-qcom, wifi-qcom-ac package. In the third, you’ll see the interface name: wlan1 for the wireless package, wifi1 for the wifi package. From here on I’ll write wlan1, substitute wifi1 if that’s what you have.
Second, access. You need a user with the full group, since we’ll be creating scripts with read, write, test policies. Third, portal credentials. Test them manually from your phone. If you can’t log in from your phone, the script won’t log in either, and that check saves you an hour.
Step 1. Back up the current config
Why: we’re about to change the Wi-Fi interface mode. If the router is currently broadcasting Wi-Fi for clients, switching to station mode will kill that. Rollback should take one command, not half an hour of trying to remember what you changed.
Where to run this: MikroTik client terminal.
/export show-sensitive file=before-cp-login
/system backup save name=before-cp-login password=StrongPassword
/file print where name~"before-cp-login"
Result: two files in the list, before-cp-login.rsc and before-cp-login.backup. In RouterOS 7, export hides passwords by default, so the show-sensitive parameter is required, otherwise the export will contain neither Wi-Fi keys nor user passwords. Download both files to your workstation via WinBox, Files section. A backup that lives only on the router itself isn’t a backup, it’s wishful thinking.
Step 2. Switch Wi-Fi to station mode
Why: so the MikroTik becomes a client of the foreign access point, like a laptop. With a single radio module, this means you won’t be able to broadcast your own Wi-Fi on that same radio. For broadcasting you need a second module or wired LAN.
Option for the wireless package, open network with a portal.
Where to run this: MikroTik client terminal.
/interface wireless security-profiles add name=cp-open mode=none
/interface wireless set wlan1 mode=station ssid="Hotel_WiFi" security-profile=cp-open frequency-mode=superchannel disabled=no
If the network has a WPA2 password plus a portal, build the profile with a key:
/interface wireless security-profiles add name=cp-psk mode=dynamic-keys authentication-types=wpa2-psk wpa2-pre-shared-key="NetworkPassword"
/interface wireless set wlan1 mode=station ssid="Hotel_WiFi" security-profile=cp-psk disabled=no
Option for the wifi package on RouterOS 7:
/interface wifi set wifi1 configuration.mode=station configuration.ssid="Hotel_WiFi" disabled=no
For a network with a password, add to the same command security.authentication-types=wpa2-psk and security.passphrase=”NetworkPassword”.
Result: the interface should get the R (running) flag. Check the registration:
/interface wireless registration-table print
/interface wifi registration-table print
Run whichever command matches your package. The output should show one line with the foreign access point’s MAC address and signal level. A signal worse than minus 75 dBm means future problems with re-logins, so better to think about an external antenna or a different install location right away.
About superchannel: on the wireless package, this mode removes regulatory and frequency restrictions. In Russia, by law you should set frequency-mode=regulatory-domain and country=russia. I left superchannel in for initial diagnostics, when the access point doesn’t show up at all. Once the connection is up, switch back to regulatory-domain.
Step 3. Bring up the DHCP client, NAT, and WAN list
Why: the foreign network will hand out an address via DHCP. The default route and DNS will also come from it. NAT is needed so your LAN clients can reach the internet through the router’s own address, since the portal only authorizes that one address.
Where to run this: MikroTik client terminal.
/ip dhcp-client add interface=wlan1 use-peer-dns=yes add-default-route=yes default-route-distance=1 disabled=no comment="cp uplink"
/interface list member add list=WAN interface=wlan1
/ip firewall nat add chain=srcnat out-interface=wlan1 action=masquerade comment="cp uplink nat"
If you have a default config with a bridge and a WAN list, a masquerade rule using out-interface-list=WAN probably already exists, and you can skip the third command. Check with /ip firewall nat print to avoid duplicates.
Result: verify the address was obtained.
/ip dhcp-client print detail where interface=wlan1
/ip route print where dst-address=0.0.0.0/0
/ping 8.8.8.8 count=4
In dhcp-client, status should be bound, with an address and gateway. The default route should go through the foreign network’s gateway. But the ping will likely fail or behave strangely. Many portals block ICMP before login, some do the opposite and only block HTTP. So ping is a poor indicator of authorization, and from here on we’ll check HTTP specifically.
Step 4. Capture the portal login form on your workstation
This part matters. It’s the main step of the whole article, and it’s where most people trip up. The script needs to send exactly the same request the browser sends. Not similar, exactly the same: same URL, same method, same field names.
Connect your laptop to the same foreign network, or to the LAN behind your MikroTik. Open any HTTP site, for example http://neverssl.com. The portal will intercept the request and show the login page.
Where to run this: browser on the workstation.
- Press F12, open the Network tab, check Preserve log.
- Enter the login and password in the portal’s form, click “Log in”.
- In the list of requests, find the first POST request, usually called login, auth, or logon.
- Open it: check Request URL and Content-Type under Headers, and Form Data under Payload.
- Right-click the request, choose Copy, then Copy as cURL. Save this to a notes file.
- View the login page’s source with Ctrl+U and find the form tag and all hidden input fields.
- Note which of these fields changes when the page reloads, and which stay static.
In practice you’ll end up with something like this. Here’s what a cURL command copied from the browser looks like for a typical hotel portal:
Where to run this: this is a sample output from the workstation, no need to run it.
curl 'http://10.10.0.1/login' \
  -H 'Content-Type: application/x-www-form-urlencoded' \
  -H 'Cookie: PHPSESSID=8f3c2a1b' \
  --data-raw 'username=room512&password=S3cret%40pw&dst=&popup=true'
You need four things from this. The address the form submits to: http://10.10.0.1/login. The method: POST, since there’s data-raw. The content type: application/x-www-form-urlencoded. The body: a string of fields joined with ampersands. Set the cookie aside for now, there’s a separate discussion of it in the troubleshooting section.
Here’s a check most people skip. Run this same cURL from your workstation on a different network, or after logging out of the portal, but without the cookie. If the login succeeds without a cookie, you’re in luck, your script will be three lines long. If not, the portal is tracking a session, and the script gets a bit more complex.
Step 5. Encode special characters in the password
Why: the form body follows URL encoding rules. If the password contains @, &, # or a space, those need to be replaced with percent codes. The browser does this automatically, fetch doesn’t. An unencoded ampersand in the password will split the string into two fields, and the portal will see a truncated password.
| Character | Code | Character | Code |
|---|---|---|---|
| space | %20 or + | @ | %40 |
| & | %26 | # | %23 |
| + | %2B | = | %3D |
| ? | %3F | % | %25 |
| $ | %24 | : | %3A |
| / | %2F | ! | %21 |
Easiest way: grab the value directly from Payload in DevTools, clicking view source. There the browser shows the already-encoded string. Paste that into the script. No need to encode letters, digits, hyphens, or dots.
A separate trap in RouterOS. A dollar sign inside a script string means a variable. If the encoded password still contains a $, escape it with a backslash. A question mark typed into the terminal triggers autocomplete, so in a URL with parameters write it as \? too. After percent-encoding, these characters usually aren’t left over, which is one more argument in favor of encoding.
Step 6. Test the login with a single terminal command
Why: before writing a script, make sure the request itself works. One command, one response. If it doesn’t work, the script won’t either, except the error will be harder to find.
Where to run this: MikroTik client terminal.
/tool fetch url="http://10.10.0.1/login" http-method=post http-header-field="Content-Type:application/x-www-form-urlencoded" http-data="username=room512&password=S3cret%40pw&dst=&popup=true" output=user
Result: status finished and a chunk of the portal page’s HTML in the data field. Often there’s text like “You are logged in” or a redirect to the hotel’s site. Now check internet access:
/tool fetch url="http://detectportal.firefox.com/success.txt" output=user
If data contains the word success, the portal let you through. If you got HTML or an error, the login failed, go to the troubleshooting section. Don’t change anything at random, first read what the portal said in response to the first command.
Why specifically detectportal.firefox.com. It’s a service address belonging to Mozilla, which Firefox queries for the same purpose: figuring out if it’s stuck behind a portal. It responds over plain HTTP with a single line, success. Any portal will intercept this request and serve its own page instead. Hence the simple indicator: got success, you have internet; got something else, you’re still stuck at the gate.
For reference on fetch parameters, keep the official MikroTik Fetch documentation handy. It covers http-method, http-data, http-header-field, output, and as-value. We’re also interested in http-max-redirect-count: by default fetch follows two redirects, and that’ll come in handy.
Step 7. Create the cp-login script
Why: move the login logic into a separate script that you can call from the scheduler, from Netwatch, or by hand. All settings are gathered at the top, so you don’t have to hunt for the password six months from now.
We write logs in Latin characters. RouterOS stores log messages in its own encoding, and Cyrillic in WinBox or a remote syslog turns into question marks. Since you’ll be reading this log at 3 AM, might as well make it readable.
Where to run this: MikroTik client terminal. Paste the whole thing as one block.
/system script add name=cp-login policy=read,write,test dont-require-permissions=no comment="captive portal login" source={
# ===== settings =====
:local wlan "wlan1"
:local loginUrl "http://10.10.0.1/login"
:local user "room512"
:local pass "S3cret%40pw"
:local extra "dst=&popup=true"
# ====================

:local body ("username=" . $user . "&password=" . $pass)
:if ([:len $extra] > 0) do={ :set body ($body . "&" . $extra) }

:local st [/ip dhcp-client get [find interface=$wlan] status]
:if ($st != "bound") do={
  :log warning ("cp-login: dhcp on " . $wlan . " is " . $st . ", skip")
  :error "no lease"
}

:do {
  :local res [/tool fetch url=$loginUrl http-method=post \
    http-header-field="Content-Type:application/x-www-form-urlencoded" \
    http-data=$body check-certificate=no output=user as-value]
  :log info ("cp-login: request sent, status=" . ($res->"status"))
} on-error={
  :log error "cp-login: fetch failed"
}
}
Here’s what’s happening, line by line. First we assemble the form body from the login, password, and extra fields. Then we check that the DHCP client is bound: no address means there’s no point hitting the portal, so we exit with a clear log entry. Then we send the POST, and any fetch error gets caught in on-error, so the script doesn’t fail silently.
The check-certificate=no parameter is left in explicitly. For HTTPS portals this is routine: a self-signed certificate on an internal IP. For fetch, this value is already the default, but writing it explicitly will save you from a colleague asking “why doesn’t it complain about the certificate”.
Result: run the script manually and check the log.
/system script run cp-login
/log print where message~"cp-login"
In the log, a line reading cp-login: request sent, status=finished. That means the request went out and the server responded. It doesn’t yet mean the login succeeded, the next script checks that.
Step 8. Create the cp-check script
Why: login by itself guarantees nothing. You need a watchdog that asks the internet “are you there?” once a minute, and if it gets a portal page back instead of an answer, calls cp-login. The logic is simple, and that’s its strength.
Where to run this: MikroTik client terminal.
/system script add name=cp-check policy=read,write,test dont-require-permissions=no comment="captive portal watchdog" source={
:local checkUrl "http://detectportal.firefox.com/success.txt"
:local online false

:do {
  :local res [/tool fetch url=$checkUrl output=user as-value]
  :local data ($res->"data")
  :if ([:pick $data 0 7] = "success") do={ :set online true }
} on-error={}

:if (!$online) do={
  :log warning "cp-check: no internet or portal detected, running cp-login"
  :do { /system script run cp-login } on-error={}
  :delay 5s

  :do {
    :local res2 [/tool fetch url=$checkUrl output=user as-value]
    :if ([:pick ($res2->"data") 0 7] = "success") do={
      :log info "cp-check: login OK, internet is up"
    } else={
      :log error "cp-check: still behind portal after login"
    }
  } on-error={
    :log error "cp-check: recheck failed"
  }
}
}
Watch the logic here. If success comes back, the script ends quietly, keeping the log clean. Writing “all good” every minute is a good way to lose anything important in the log within a month. If success doesn’t come back, we write a warning, log in, wait five seconds, and check again. The second check logs the outcome: success or failure.
Five seconds isn’t a magic number. Some portals apply access rules with a delay, and on slow controllers that can be 10-15 seconds. If you see “still behind portal” in the log but everything works a minute later, increase the delay.
Step 9. Put the check on a schedule
Why: two triggers. The first runs once a minute and catches expired sessions. The second runs at startup, with a delay, so the Wi-Fi has time to connect and get an address.
Where to run this: MikroTik client terminal.
/system scheduler add name=cp-check-1m interval=1m start-time=startup policy=read,write,test on-event="/system script run cp-check" comment="captive portal watchdog"
/system scheduler add name=cp-check-boot start-time=startup policy=read,write,test on-event=":delay 40s; /system script run cp-check" comment="captive portal on boot"
Result: in /system scheduler print, you’ll see both tasks, with run-count increasing for the first one. The scheduler’s policies must match the scripts’ policies. If scheduler has fewer policies than the script, the script simply won’t run, and you won’t see any error, just silence in the log.
Why a one-minute interval and not ten seconds. Every check is an HTTP request through someone else’s network. On a weak hAP lite that’s CPU load, and in the portal’s logs you’ll look like a bot. A minute is a good balance: maximum downtime after a session drop is a bit over a minute, and nobody gets nervous.
Here’s what the full cycle looks like from the network’s perspective:
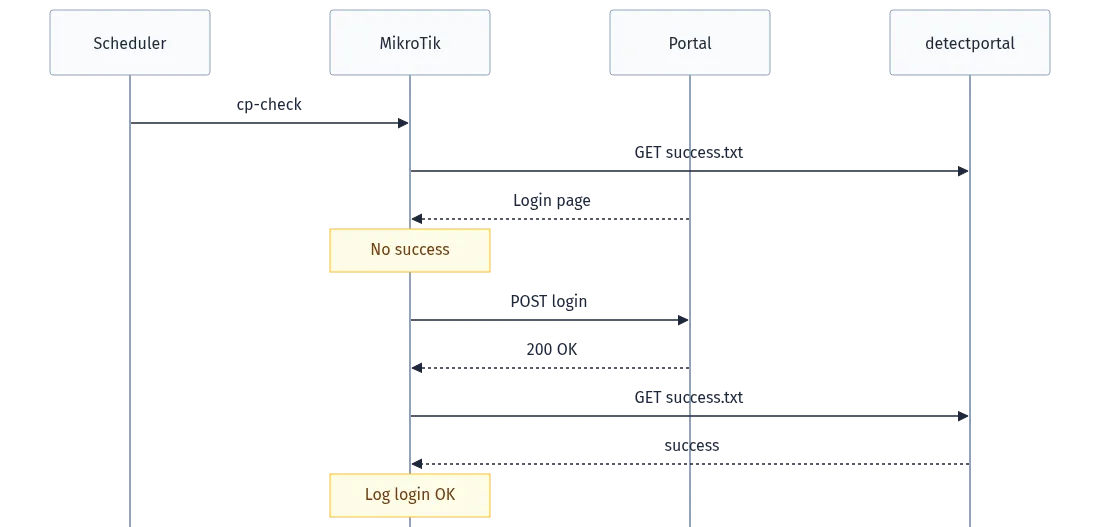
Pay attention to the third arrow. The request to detectportal before login gets intercepted by the portal, not by Mozilla’s server. That’s exactly why we don’t need any fancy parsing: it’s enough to check whether the real server responded, not an impostor.
Step 10. Portals with dynamic fields
If in step 4 you noticed that some form fields change every time, a static script won’t work. The three most common cases: the portal wants your MAC, your IP, or a one-time token from the login page in the request.
The router knows its own MAC and IP. Encode colons in the MAC as %3A, otherwise some portals won’t recognize the address.
Where to run this: MikroTik client terminal. This fragment goes into cp-login right before the body assembly line.
:local mac [/interface get [find name=$wlan] mac-address]
:local macEnc ""
:for i from=0 to=([:len $mac] - 1) do={
  :local c [:pick $mac $i]
  :if ($c = ":") do={ :set macEnc ($macEnc . "%3A") } else={ :set macEnc ($macEnc . $c) }
}

:local cidr [/ip dhcp-client get [find interface=$wlan] address]
:local ip [:pick $cidr 0 [:find $cidr "/"]]

:set extra ("mac=" . $macEnc . "&ip=" . $ip . "&" . $extra)
The field names mac and ip are just examples here. Use whatever you saw in Payload: some portals call it client_mac and ipc, others clientMac and userIp, others something else entirely. Match it letter for letter, case matters too.
Tokens are trickier. You have to pull them from the login page first. We get the page using the same request to detectportal: the portal intercepts it and returns the form’s HTML. Then we search the HTML for the hidden field we need.
Where to run this: MikroTik client terminal, fragment for cp-login.
:local token ""
:do {
  :local page [/tool fetch url="http://detectportal.firefox.com/success.txt" output=user as-value]
  :local html ($page->"data")
  :local key "name=\"token\" value=\""
  :local p [:find $html $key]
  :if ([:typeof $p] = "num") do={
    :local s ($p + [:len $key])
    :local e [:find $html "\"" $s]
    :set token [:pick $html $s $e]
  }
} on-error={ :log error "cp-login: cannot load portal page" }

:if ([:len $token] = 0) do={
  :log error "cp-login: token not found"
  :error "no token"
}
:set extra ("token=" . $token . "&" . $extra)
Adjust the key string to match your HTML. If the source has value written before name, or uses single quotes, the search won’t match. Copy the tag fragment from the page source as-is and escape double quotes with a backslash.
There’s a subtlety here that forums don’t mention. output=user has a size limit on the response, and a large page with embedded images might not fit entirely into a variable. If the token sits at the very end of a huge page, save the response to a file using dst-path and read it via /file get contents. For most lightweight portals this isn’t needed.
Some portals only serve the login page after a couple of redirects. By default fetch follows two. If there are more redirects, add http-max-redirect-count=5 to the request.
Setting it up isn’t enough. You need to make sure the scheme survives real-world events: session expiry, reconnects, and reboots. Check step by step, from simple to tough.
Where to run this: MikroTik client terminal.
/interface wireless registration-table print
/ip dhcp-client print where interface=wlan1
/tool fetch url="http://detectportal.firefox.com/success.txt" output=user
/system scheduler print where name~"cp-check"
/log print where message~"cp-"
| Check | Normal | If not |
|---|---|---|
| registration-table | One entry, signal better than minus 75 dBm | No link to the AP, check ssid and security |
| dhcp-client | status bound, has an address | Portal isn’t issuing an address, check the AP’s MAC filter |
| fetch detectportal | data: success | Login failed, check the cp-login log |
| scheduler | run-count increasing every minute | Scheduler and script policies don’t match |
| log | Occasional cp-check and login OK entries | Entries every minute means the portal isn’t accepting the login |
Now the tough test: break the session yourself. Disable and re-enable the Wi-Fi interface, wait a couple of minutes, and check the log.
/interface disable wlan1
:delay 5s
/interface enable wlan1
:delay 120s
/log print where message~"cp-"
Normal result: one warning entry noting the portal was detected, and one info entry saying “login OK”. If the portal doesn’t reset the session on reconnect, there won’t be any entries at all, and that’s fine too. The final test is a full router reboot with /system reboot. After booting, within 40-60 seconds, cp-check-boot should run in the log.
And check from the LAN client’s side too. On a workstation behind the MikroTik, open any site. It should load without a portal page. If the laptop sees the portal but the router doesn’t, check that NAT is set up and the client is actually going through the MikroTik, not through another network.
Troubleshooting: common errors and fixes
It’s not as bad as you think. It’s worse, because every portal is written by a different contractor, and there are as many standards as there are contractors. Below are the errors I’ve run into most often, in the format: symptom, cause, fix.
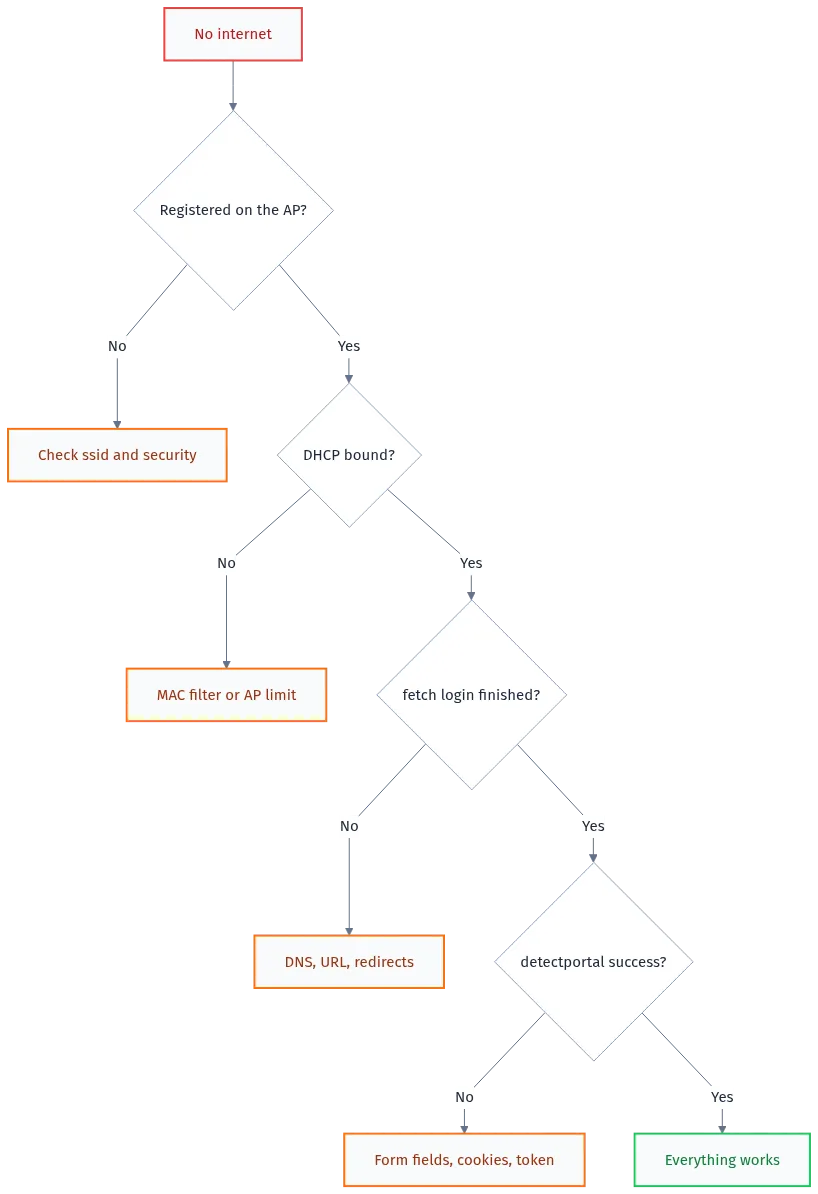
Error: fetch failed, could not resolve host
Cause: the portal lives at a domain name like login.hotel.local, but the router’s DNS points at public servers. Only the foreign network’s DNS knows that internal name. Classic case: you set 1.1.1.1 in /ip dns servers at some point and forgot about it.
Fix: enable use-peer-dns on the DHCP client and check that the foreign network’s DNS made it into the list. Or use the portal’s IP in the script instead of the name.
Where to run this: MikroTik client terminal.
/ip dhcp-client set [find interface=wlan1] use-peer-dns=yes
/ip dns print
:put [:resolve "login.hotel.local"]
If the portal’s name resolves, but only through their DNS, while you want to route everything else through your own, add a static record with the portal’s IP. You can see it in DevTools, under Remote Address.
/ip dns static add name=login.hotel.local address=10.10.0.1 comment="captive portal"
Error: status finished, but still no internet
Cause: the request got through, the portal returned 200, but it didn’t count as a successful login. The portal politely sent back the same login page with an error, and fetch honestly reported “downloaded”. A 200 response only means the server is alive.
Fix: look at exactly what the portal returned. Save the response to a file and read it.
Where to run this: MikroTik client terminal.
/tool fetch url="http://10.10.0.1/login" http-method=post http-header-field="Content-Type:application/x-www-form-urlencoded" http-data="username=room512&password=S3cret%40pw" dst-path=cp-answer.html
:put [/file get cp-answer.html contents]
Look for words like error, invalid, expired in the text. Most often it’s one of three things: a missing hidden field, incorrectly encoded password, or a missing session cookie. Compare the request body against the Payload from DevTools character by character. Not by eye, but by pasting both strings into one notes file, one under the other.
Error: the portal requires a session cookie
Cause: the portal sets a cookie when showing the login page and only accepts a POST alongside it. Fetch doesn’t store cookies: every call is like the first time for it.
Fix: get the cookie with the first request and pass it with the second. RouterOS 7’s fetch has a output=user-with-headers mode that returns response headers along with the body. Check on your version that headers actually show up in data before building a script around it.
Where to run this: MikroTik client terminal.
{ :local r [/tool fetch url="http://10.10.0.1/login" output=user-with-headers as-value]; :put ($r->"data") }
The curly braces aren’t decoration. In the terminal, each line lives in its own scope, and a :local variable from the first line no longer exists on the second. The braces combine both commands into one block.
If you see a Set-Cookie line with a name like PHPSESSID in the output, extract the value using the same :find and :pick trick as the token in step 10, and add it to the POST’s Cookie header. Multiple headers in http-header-field are separated by commas.
/tool fetch url="http://10.10.0.1/login" http-method=post http-header-field="Content-Type:application/x-www-form-urlencoded,Cookie:PHPSESSID=8f3c2a1b" http-data="username=room512&password=S3cret%40pw" output=user
If there’s nothing useful in the headers and the portal won’t let you in without a cookie, your road leads to the alternatives section, where we cover an external curl script. Cookies are easier to handle there.
Error: bad request or 405 Method Not Allowed
Cause: wrong method or wrong Content-Type. Some modern portals accept JSON instead of a form. Others, the opposite, expect GET with parameters in the URL.
Fix: check Content-Type under Request Headers in DevTools. If it says application/json, change the header and the body format.
Where to run this: MikroTik client terminal.
/tool fetch url="https://portal.example.net/api/auth" http-method=post http-header-field="Content-Type:application/json" http-data="{\"login\":\"room512\",\"password\":\"S3cret@pw\"}" output=user
Note: in JSON, the password isn’t percent-encoded, but quotes are escaped with a backslash. If the portal accepts GET, the parameters go straight into the URL, and a question mark typed into the terminal must be written as \?.
/tool fetch url="http://10.10.0.1/login\?username=room512&password=S3cret%40pw" output=user
Error: a portal running on a MikroTik Hotspot in CHAP mode
Cause: if the foreign access point is itself a MikroTik running Hotspot, the default login page hashes the password in the browser via JavaScript: an MD5 of chap-id, the password, and chap-challenge. None of that is available in a static script, and a POST with a plain password will get rejected if HTTP PAP is disabled.
Fix: check whether the portal accepts a plain password. MikroTik Hotspot’s form posts to /login with username and password fields. If the Hotspot profile has the http-pap method enabled, a simple request will work.
/tool fetch url="http://10.5.50.1/login" http-method=post http-header-field="Content-Type:application/x-www-form-urlencoded" http-data="username=room512&password=S3cret%40pw" output=user
If that doesn’t work, the portal’s administrator left only CHAP enabled. In that case there’s only one honest path: ask them for a MAC-address binding, or a separate account with a by-mac login type. On MikroTik Hotspot, this is a single line of ip hotspot ip-binding on their end, and your script becomes entirely unnecessary.
Error: script works manually but not on schedule
Cause: policies. The scheduler runs the script with its own permissions. If the scheduler lacks test or write, fetch inside the script simply won’t execute, and there won’t be an error in the log.
Fix: align the policies between the scheduler and both scripts.
Where to run this: MikroTik client terminal.
/system script set [find name~"cp-"] policy=read,write,test
/system scheduler set [find name~"cp-check"] policy=read,write,test
/system script print detail where name~"cp-"
One more trap: script ownership. The scheduler runs the script as the user who created it. If you created the script under a user with a restricted group, permissions may fall short even with correct policies set.
Error: log says login OK, but the portal is back 10 minutes later
Cause: the portal drops you after an idle period, or checks whether the client is “alive”. There’s a worse case too: two of your devices are on the network with the same account, and the portal drops the older session each time a new login happens.
Fix: first, find the second device. A phone you logged in with the same account while testing is a frequent culprit. If it’s idle timeout, add a lightweight keepalive to cp-check: even a request to detectportal once a minute is usually counted as activity by the portal. If the portal drops sessions on a timer, once a day, your script already handles that, downtime will be around a minute.
Error: certificate issue with an HTTPS portal
Cause: someone on your team set check-certificate=yes “for security. The portal has a self-signed certificate on an internal IP, and RouterOS can’t find a trust chain.
Fix: for an internal portal, set check-certificate=no. This is a deliberate trade-off: a guest Wi-Fi account isn’t a secret worth importing a foreign CA onto the router for. If the portal is external with a proper certificate, you can keep verification on, but then the router needs correct time, otherwise verification will fail due to expiration.
/system ntp client set enabled=yes servers=pool.ntp.org
/system clock print
Time, by the way, isn’t synced via NTP before you’ve logged into the portal. It’s a closed loop: HTTPS needs time, time needs internet, internet needs HTTPS. That’s why check-certificate=no for portals isn’t laziness, it’s an engineering decision.
Alternative solutions
A fetch script isn’t the only way. Sometimes it’s not even the best way. Here’s what else works, and when to choose it.
| Method | When it fits | Downsides |
|---|---|---|
| Fetch script plus scheduler | Web portal with a simple form, the main recipe | Breaks when the portal changes |
| WPA2-Enterprise in a security profile | Access point requires login at the Wi-Fi level | Doesn’t work with web portals |
| Netwatch with a down-script | Only need a reaction to a lost connection | Doesn’t see a portal that still answers ping |
| Manual login from a laptop behind NAT | One-off task, session lasts weeks | No automation at all |
| External script using curl or Python | Portal with cookies, JavaScript, a light captcha | Needs a second device or a container |
| MAC binding by the network admin | You have someone to negotiate with | Depends on someone else’s admin |
WPA2-Enterprise: authorization on the AP without scripts
If the access point asks for a login and password before connecting, that’s 802.1X, and RouterOS handles it natively. Login happens at every association with the access point, automatically, with no schedules or checks. It’s the most reliable option of all, though sadly you usually don’t get to choose it.
For the wireless package, RouterOS only supports PEAP with the inner method MSCHAPv2, as stated directly in the MikroTik wiki on PEAP client setup.
Where to run this: MikroTik client terminal.
/interface wireless security-profiles add name=corp-eap mode=dynamic-keys authentication-types=wpa2-eap eap-methods=peap supplicant-identity="ivanov" mschapv2-username="ivanov" mschapv2-password="ADPassword" tls-mode=dont-verify-certificate
/interface wireless set wlan1 mode=station ssid="Corp_WiFi" security-profile=corp-eap disabled=no
For the wifi package on RouterOS 7, the same parameters go into the interface’s security settings:
/interface wifi set wifi1 configuration.mode=station configuration.ssid="Corp_WiFi" security.authentication-types=wpa2-eap security.eap-methods=peap security.eap-username="ivanov" security.eap-password="ADPassword" disabled=no
Result: an entry appears in registration-table, with wireless or wifi lines about the connection in the log. If PEAP didn’t come up on older 7.x, update RouterOS: in release 7.15 MikroTik specifically fixed client authentication for eap-peap and mschapv2, as noted in a thread on the MikroTik forum.
About dont-verify-certificate. This means the router doesn’t verify the RADIUS server’s certificate. On a corporate network, that’s a hole: an attacker with a rogue access point can capture a hash of your password. If possible, import the organization’s CA and verify the certificate. If not, at least use a dedicated account for the router instead of your own domain login.
Netwatch instead of scheduler
Netwatch can run a script when a host transitions to down state. It looks elegant, but there are two caveats. First: many portals let ICMP through before authorization, so a ping to 8.8.8.8 will stay green while sites still don’t load. Second: Netwatch runs scripts as the system user and only with read, write, test, reboot policies, so permissions need careful setup.
Where to run this: MikroTik client terminal.
/tool netwatch add name=cp-watch type=icmp host=8.8.8.8 interval=30s down-script="/system script run cp-login" comment="captive portal fallback"
I use Netwatch as a second layer: it catches a complete loss of connectivity faster than the one-minute schedule. The main watchdog remains cp-check, since it specifically checks HTTP, not ICMP.
External script using curl
When a portal gets really ugly, cookies, redirects through three domains, JavaScript, it’s easier to hand the login off to a tool built for that. curl keeps a cookie jar, follows any redirects, and understands everything a browser does except JavaScript. You can run it on a Raspberry Pi behind the router, or in a container on the MikroTik itself, if the model supports container.
Where to run this: a Linux host on the LAN behind the MikroTik client.
#!/bin/bash
# /usr/local/bin/cp-login.sh
JAR=/tmp/cp.cookies
if curl -s --max-time 5 http://detectportal.firefox.com/success.txt | grep -q '^success'; then
  exit 0
fi
curl -s -c "$JAR" -b "$JAR" -L http://10.10.0.1/login -o /dev/null
curl -s -c "$JAR" -b "$JAR" -L -X POST http://10.10.0.1/login \
  --data-urlencode 'username=room512' \
  --data-urlencode 'password=S3cret@pw' \
  -o /dev/null
logger -t cp-login "login attempt done"
chmod +x /usr/local/bin/cp-login.sh
( crontab -l 2>/dev/null; echo '* * * * * /usr/local/bin/cp-login.sh' ) | crontab -
Notice that curl encodes the password itself via –data-urlencode, so you don’t need the percent-code table anymore. The portal still sees a single IP, the MikroTik’s address after NAT, so logging in from the Linux host opens internet access for the whole LAN. One bad habit can sink the whole setup: a single line in crontab without a comment is all it takes for a whole team to spend a year wondering why the portal’s logs show requests once a minute. Comment it.
Why fetch remains the main option
Everything lives on one device. There’s no second box to power, update, and worry about dying first. The config exports together with the router in one command, and when you swap hardware, it moves as a whole. For 80% of the portals I’ve seen at hotels, business centers, and remote sites, a simple form and fetch is more than enough.
Prevention: monitoring, backups, security
Monitoring
Nobody reads the router’s log until something breaks. So script errors need to go somewhere people will actually see them. At minimum, a remote syslog. If you have Zabbix or a Telegram alert bot, send it there.
Where to run this: MikroTik client terminal. Replace 192.168.88.10 with your own syslog server.
/system logging action add name=remote target=remote remote=192.168.88.10 remote-port=514
/system logging add topics=script action=remote
/system logging add topics=error action=remote
For Telegram, add a fetch call to the bot’s API at the end of the error block in cp-check. Plug in your own token and chat_id. If there’s no internet, the message obviously won’t go out, so send it after a successful re-login instead: “portal was there, logged back in”. That way you’ll see how often the portal kicks you out, and notice if the frequency suddenly increases.
/tool fetch url="https://api.telegram.org/bot<TOKEN>/sendMessage" http-method=post http-header-field="Content-Type:application/json" http-data="{\"chat_id\":\"<CHAT_ID>\",\"text\":\"cp-login: relogin done\"}" output=none
Security
Where to run this: MikroTik client terminal.
/interface list member print where list=WAN
/ip firewall filter add chain=input in-interface-list=WAN connection-state=established,related action=accept comment="cp: allow replies"
/ip firewall filter add chain=input in-interface-list=WAN action=drop comment="cp: drop all from uplink"
/ip service set [find name~"telnet|ftp|www|api"] disabled=yes
/ip service set [find name~"ssh|winbox"] address=192.168.88.0/24
/tool mac-server set allowed-interface-list=LAN
/tool mac-server mac-winbox set allowed-interface-list=LAN
/ip neighbor discovery-settings set discover-interface-list=LAN
Check that the drop rule sits below the accept rules for LAN. In the default MikroTik config such a rule already exists, so it’s enough to confirm wlan1 is in the WAN list without duplicating anything. Replace the 192.168.88.0/24 subnet with your own.
The RouterOS equivalent of fail2ban is an address list for SSH brute-force attempts. Since all services on the wlan1 side are already closed off, this is a second line of defense, in case someone on the LAN decides to play hacker.
/ip firewall filter add chain=input protocol=tcp dst-port=22 src-address-list=ssh-blacklist action=drop comment="ssh bruteforce drop"
/ip firewall filter add chain=input protocol=tcp dst-port=22 connection-state=new src-address-list=ssh-stage2 action=add-src-to-address-list address-list=ssh-blacklist address-list-timeout=1d
/ip firewall filter add chain=input protocol=tcp dst-port=22 connection-state=new src-address-list=ssh-stage1 action=add-src-to-address-list address-list=ssh-stage2 address-list-timeout=1m
/ip firewall filter add chain=input protocol=tcp dst-port=22 connection-state=new action=add-src-to-address-list address-list=ssh-stage1 address-list-timeout=1m
SSH hardening: enable strong-crypto, set up a key and a separate admin account, disable the default admin user. Drop the public key id_ed25519.pub into Files via WinBox beforehand. Order matters: test logging in as the new user in a separate session first, then disable the old one.
/ip ssh set strong-crypto=yes
/user add name=netadm group=full password="LongPassword"
/user ssh-keys import user=netadm public-key-file=id_ed25519.pub
/user disable admin
A separate note on the portal password sitting in the script. It’s stored as plain text in source, and any user with read permission can see it. There’s no separate database here, but the logic is the same: if contractors access the router, set up a group for them without the sensitive policy and without read access to scripts. A contractor seeing the hotel Wi-Fi password isn’t a disaster. A contractor seeing an 802.1X password tied to a domain account is an incident.
Backups
| What | How often | Where to store | How to restore |
|---|---|---|---|
| Text export with passwords | After every change and weekly | Off the router: git, a file server | /import file-name=name.rsc on a clean router |
| Binary backup | Weekly | Off the router, encrypted | /system backup load on the same model |
| cp-login and cp-check scripts | On every edit | Alongside the export, as a separate file | Paste the block into the terminal |
Set up a weekly automatic backup saved on the router itself and pulled via SFTP from a server. A binary backup can only be restored on the same model, so the text export matters more, since it can be loaded onto any MikroTik.
Where to run this: MikroTik client terminal.
/system script add name=weekly-backup policy=read,write,test,policy,sensitive source={
:local d [/system clock get date]
/export show-sensitive file=("cp-export-" . $d)
/system backup save name=("cp-backup-" . $d) password="BackupPassword"
}
/system scheduler add name=weekly-backup interval=7d start-time=03:30:00 policy=read,write,test,policy,sensitive on-event="/system script run weekly-backup"
Restoring the scripts after a reset is the same block from steps 7-9, so keep it in one file, cp-portal.rsc. Test the restore at least once on a spare router. A backup you’ve never restored is just a file.
Auto-start
We already have this covered: the cp-check-boot scheduler entry with a 40-second delay. Check whether that delay is enough for your hardware. On a hAP lite, booting and connecting to Wi-Fi can take over a minute, in which case the first run just fires idle, and the one-minute watchdog picks up the slack. Not critical, just an extra log entry.
Upgrading RouterOS without surprises
Before upgrading, run an export and read the changelog for anything touching fetch, scripting, and wireless/wifi. Script syntax rarely changes between 7.x releases, but parameter renames do happen. Only upgrade on the stable or long-term branch, running testing on a remote site with no one around to fix it isn’t engineering, it’s recklessness.
Where to run this: MikroTik client terminal.
/export show-sensitive file=before-upgrade
/system package update set channel=stable
/system package update check-for-updates
/system package update install
After the reboot, run through the whole verification section again. Rollback: download the npk for the version you need matching your architecture from MikroTik’s site, upload it to Files, and run /system package downgrade. The router will reboot into the old version, keeping the config intact.
There’s a separate trap for remote sites. If the upgrade breaks the Wi-Fi driver, the router won’t reconnect to the access point, and you won’t be able to reach it remotely. So only upgrade such devices when there’s someone nearby who can power-cycle it and plug in a cable. Legacy code born from a refactor doesn’t scare easily. But it’s also not in a hurry to get upgraded on a Friday evening.
Why doesn’t MikroTik’s automatic authorization work after setup?
Nine times out of ten, the request from the script differs from the browser’s request: a hidden field got missed, the password isn’t encoded, or the portal expects a cookie. Save the portal’s response to a file via dst-path and read it, the reason for the rejection is usually spelled out right there. The tenth case is scheduler policies preventing the script from running at all.
How do I check that access point authorization is working correctly?
Run a fetch in the terminal to detectportal.firefox.com/success.txt with output=user. If data comes back with success, internet access is open. For a full check, disable and re-enable the Wi-Fi interface, and after a couple of minutes check the log filtered by cp-: there should be a login OK entry.
Can I connect a MikroTik to Wi-Fi with web authorization through a browser?
Yes, and it’s the fastest one-off method. Connect the router to the access point in station mode, set up NAT, and log into the portal from any laptop behind the MikroTik. The portal sees the router’s IP and MAC, so internet access opens up for the whole local network. One downside: once the session expires, you’ll have to repeat the whole thing, which is why a script is needed for ongoing operation.
What should I do if /tool fetch returns an error when logging into the portal?
Look at the error text. Could not resolve host means a DNS problem, enable use-peer-dns or use the portal’s IP directly. A redirect error means you need to add http-max-redirect-count. An SSL error means check check-certificate=no. A 405 or 400 response means wrong method or Content-Type, compare it against DevTools.
How does logging in via a fetch script differ from WPA2-Enterprise?
WPA2-Enterprise authorizes at the Wi-Fi level itself through 802.1X: until the login is accepted, the access point won’t even let you onto the network. There, the login goes into the security profile, and RouterOS logs in on its own every time it connects. A fetch script is for web portals, where the network is open and internet access is granted only after submitting the form. These are two different technologies, and the choice between them belongs to whoever owns the access point, not to you.
How do I connect a MikroTik to public Wi-Fi with SMS authorization?
You can’t fully automate this kind of login: the code arrives on a phone and is different every time. But most such networks remember the MAC address for a period ranging from a day to a month after login. Log in once from a laptop behind the MikroTik, and the router will be treated as authorized for the rest of that period. Keep in mind the legal requirement: in Russia, public Wi-Fi must identify the user, and the login is tied to your phone number.
Why does authorization drop after a MikroTik reboot?
Many portals tie the session to a DHCP lease or to the association with the access point. After a reboot the router reconnects, and the portal treats it as a new client. This is fixed with a scheduler task using start-time=startup and a 40-60 second delay, which runs the check and login after boot.
Is it safe to store the portal password in a MikroTik script?
It’s stored as plain text and visible to any user with read permission on scripts. For guest Wi-Fi that’s acceptable. For 802.1X with a domain account, it’s not: set up a dedicated service account for the router with minimal rights and restrict RouterOS user groups.
Outlook
We switched the MikroTik to client mode, captured the exact login form request in a browser, and taught the router to replay it with the fetch command. On top of that we added a cp-check watchdog that tells the real internet apart from a portal’s imposter page once a minute and logs back in, plus a run after reboot. For access points using 802.1X, we covered logging in through a security profile, where no script is needed at all. The router is locked down from the foreign network’s side, and the config gets exported weekly.
Now an expired session costs you a minute of downtime and one log line, not a trip to the site. The portal might switch contractors, rename its fields, or add a captcha, and then you’ll need to repeat the recipe starting from step 4. Keep the cURL from DevTools in the same repository as the router’s export, next time that’ll save you an hour.

Author: Андрей А.
Оставайтесь на связи
Рецепты от IT-боли. Без воды, без рекламы, без маркетинговой шелухи.
Подписаться на IT-Аптеку →

Поймал грабли на портале, который после логина выдаёт новую страницу с таймером и кнопкой «продлить». Мой cp-check исправно видел, что интернета нет, и слал POST повторно, но портал отвечал «сессия уже активна» и ничего не менял. Помогло другое: скрипт сначала запрашивает саму страницу-заглушку, вытаскивает оттуда одноразовый токен и только потом логинится. Вопрос: почему портал вообще отдаёт страницу с обновляющимся токеном, если сессия уже живая, и как отличить нормальную переавторизацию от бесконечного цикла запросов?
Токен на странице обновляется даже при активной сессии, потому что портал не знает, кто именно за роутером сидит. У вас за NAT десяток устройств, каждое со своим браузером, и для портала это один клиент с одним MAC. Страница-заглушка генерируется на каждый запрос, чтобы привязать её к конкретному браузеру через cookie, а не к вашему MikroTik. Отсюда и «сессия уже активна»: вы шлёте POST без этого cookie, и портал считает запрос чужим.
Лечится так: в /tool fetch добавьте http-header-field=”Cookie: <ваш_куки>” и сохраняйте куки из ответа через as-value. Проверить цикл просто: в cp-check после fetch смотрите не только status, но и содержимое ответа. Если там нет “login” или “success”, не повторяйте POST, а ждите следующего тика. Иначе получите бан по IP за спам. На RouterOS 7.15+ удобно вынести проверку в /system script с :local httpCode. Если портал отвечает 200, но тело пустое, считайте это успехом и не дёргайте его минуту.
Столкнулся с тем, что логин проходит, интернет появляется, а через 5 минут отваливается. Оказалось, портал привязал сессию к User-Agent браузера, которым я собирал форму. Скрипт отправлял fetch с дефолтным RouterOS, портал считал это новым устройством и плодил сессии, убивая старые. Лечилось добавлением http-header-field с тем же User-Agent, что в Chrome. Почему порталу вообще есть дело до того, кто именно шлёт POST, если MAC и IP остаются теми же?
User-Agent это самый частый маркер для порталов, которые заворачивают клиентов через RADIUS и хотят отличать типы устройств. В fetch его можно задать через http-header-field=”User-Agent: Mozilla/5.0…” в теле запроса. Хуже другой случай: портал кладёт в форму httpOnly cookie, полученную от сервера при GET страницы, и проверяет её на бэкенде. Сам по себе fetch её не подставит, а POST без cookie проваливается молча, статус 200 и пустой ответ. Проверить просто: в DevTools посмотри, уходит ли на login-URL предварительный GET, и сравни заголовки. Если cookie есть, в RouterOS 7 её нечем сохранить в паузе между двумя fetch, там нет cookie jar. Обходной путь один: сначала /tool fetch mode=https url=… с http-data, забрать Set-Cookie, выдрать значение через :pick и подставить в следующий запрос вручную. Работает, но при ротации токена каждые пару минут придётся дергать оба запроса в связке внутри одного скрипта. На старых 6.4x with as-value поведение fetch иное, там часть заголовков не переопределяется вообще.