

- Docker ate the disk: container logs without rotation and leftover images fill the partition to 100%
- SSD wears out faster than expected: journald and Docker write constantly, TBW drains unnoticed
- Backups weren’t working: the script existed, nobody checked it, and when it mattered the backup turned out empty
- A UPS with simulated sine wave killed the PSU: ATX power supplies need a clean sine wave
- Containers stopped starting after an update: auto-update with no compatibility check
A year ago everything was fine
You set up a home server. Installed Proxmox, deployed half a dozen Docker containers, configured Wireguard, added Nextcloud and a media server. Everything works. You wrote “server ready” in your notes and forgot about it.
A year later: three incidents in two weeks. An SSD with unexpected wear, a disk under Docker filled to zero, a backup that hadn’t run in three months, and a power supply that didn’t survive the first serious power outage. All of this is classic stuff everyone goes through on their own, because nobody warns you about it ahead of time.
This article breaks down what goes wrong on a home server after 8-12 months of continuous operation. With diagnostic commands, concrete numbers, and how to fix it before your data disappears.
This covers a typical stack: Linux (Debian/Ubuntu or Proxmox), Docker Compose, a handful of persistent containers, SSD as the system drive, 24/7 operation.
Problem one: SSD wear
Why a home server kills an SSD fast
On a home PC, an SSD lives for years because it writes little. A server works differently. It writes constantly: journald collects kernel and service logs, Docker writes stdout from every container into JSON files, Nextcloud indexes files, databases commit transactions. All of this is continuous 24/7 writing.
A 500 GB consumer SSD usually has a TBW (Total Bytes Written) rating in the 150-300 TB range. Sounds like a lot. But at 10-20 GB written per day, which is a modest load for a server running Docker, the endurance runs out in 4-8 years. If logging isn’t capped, the real number is worse.
Check your current wear. For a SATA SSD:
sudo apt install smartmontools -y
sudo smartctl -A /dev/sda | grep -E "Wear|Life|Written|TBW"
For NVMe:
sudo smartctl -a /dev/nvme0 | grep -E "Percentage Used|Data Units Written"
What to look at in the output:
| SMART attribute | Value | What it means |
|---|---|---|
| SSD_Life_Left (ID 231) | 97 = 3% worn, 70 = 30% worn | Direct remaining life on Kingston drives |
| Wear_Leveling_Count (ID 177) | Lower value = higher wear | Samsung and other vendors |
| Media_Wearout_Indicator (ID 233) | Close to 0 means the drive is dying | Intel SSD |
| Percentage Used (NVMe) | 0-100%, 100% = endurance exhausted | All NVMe drives |
| Power_On_Hours (ID 9) | 8760 hours = 1 year of operation | Check actual uptime |
If SSD_Life_Left is already below 80% after the first year, you have a write intensity problem. Track down the source. Don’t panic though, the drive won’t die tomorrow. You have time to find the culprit, limit writes, and plan a replacement before the drive starts throwing errors. That’s the whole point of regular SMART monitoring: so you replace the drive on your own schedule during the day, not on the night it decides to die.
Find what’s killing the drive
Install iotop and see who’s writing right now:
sudo apt install iotop -y
sudo iotop -o -d 5
The -o flag shows only processes with active I/O. The -d 5 flag refreshes every 5 seconds. Watch the DISK WRITE column.
Three usual suspects: journald, Docker, and the database (if Nextcloud or something similar runs without caching).
Limit journald
By default journald keeps up to 10% of disk space. On a 500 GB drive that’s 50 GB of logs. And it writes them continuously with no rate limit.
sudo nano /etc/systemd/journald.conf
Add or uncomment:
[Journal]
SystemMaxUse=500M
SystemMaxFileSize=50M
MaxRetentionSec=1month
RateLimitInterval=30s
RateLimitBurst=10000
Apply without a reboot:
sudo systemctl restart systemd-journald
sudo journalctl --vacuum-size=500M
After this, journald will keep no more than 500 MB of logs and rotate old entries automatically.
Limit Docker logs
By default Docker writes every container’s stdout to JSON with no limits at all. An active container like Nextcloud or nginx with access logs can accumulate tens of gigabytes over a few months.
Global limit via /etc/docker/daemon.json:
sudo nano /etc/docker/daemon.json
{
  "log-driver": "json-file",
  "log-opts": {
    "max-size": "20m",
    "max-file": "5"
  }
}
sudo systemctl restart docker
This applies to new containers. Already-running containers need to be recreated. For each service in docker-compose.yml you can set it individually:
services:
  nextcloud:
    image: nextcloud:latest
    logging:
      driver: "json-file"
      options:
        max-size: "10m"
        max-file: "3"
After these two changes, daily disk writes drop 3-5x on a typical homelab stack. The difference shows up not only in SMART data but also in how fast the server responds during busy periods, because the disk isn’t tied up with continuous background log writes.
Problem two: Docker ate the whole disk
Where the gigabytes come from
After a year of operation, /var/lib/docker turns into a dump. Stopped containers, old images left over from updates, anonymous volumes nobody deleted, build cache if you ever built images locally. All of this quietly takes up space.
Check the current state:
docker system df
The output shows four rows: Images, Containers, Volumes, Build Cache, with sizes and how much you can reclaim.
If you need to know exactly what’s eating space in /var/lib/docker:
sudo du -sh /var/lib/docker/* | sort -rh | head -10
Usual suspects: overlay2 (image layers and container filesystems), containers (JSON logs), volumes (data not tied to any service).
Cleanup by safety level
Three levels of aggressiveness, from safe to radical.
Level 1: safe, doesn’t touch anything live:
docker container prune -f
docker image prune -f
docker network prune -f
Removes stopped containers, untagged (dangling) images, unused networks. Doesn’t touch volumes.
Level 2: reclaims more, but be careful:
docker system prune -f
Same thing in one command, plus build cache. Doesn’t touch running containers or their images.
Level 3: the nuclear option, only if you know exactly what you’re doing:
docker system prune -a -f --volumes
Removes everything, including images not currently in use. After this you’ll need to recreate every stopped service from scratch: images will download again, but data in named volumes survives as long as you didn’t pass –volumes.
# Check log size per container
sudo du -sh /var/lib/docker/containers/*/*-json.log | sort -rh

# Truncate all logs (careful: loses history)
sudo sh -c "truncate -s 0 /var/lib/docker/containers/*/*-json.log"
Automatic cleanup via cron
Instead of cleaning up manually twice a year, set up weekly auto-cleanup. Safe level only, won’t touch anything running:
sudo crontab -e
# Docker cleanup every Sunday at 3:00
0 3 * * 0 /usr/bin/docker system prune -f >> /var/log/docker-prune.log 2>&1
Problem three: backups that don’t exist
The illusion of a backup
On most home servers, a year in, the situation looks like this: the script is written, cron is set up, but nobody has ever checked what’s inside the archive. And inside is a mount error from month one that the script swallowed and kept going. Technically the backup “runs” every night. In reality it’s empty.
Second scenario: the backup goes to the same disk. The disk dies, taking both the primary data and the backup with it. That’s not a backup, that’s an illusion of safety.
The 3-2-1 rule in short: three copies of your data, on two different media, with one of them offsite (cloud, an external drive at a relative’s place, a VPS).
Restic: a minimal working backup
Restic is a tool for incremental encrypted backups. A single binary, works with local directories, SFTP, S3-compatible storage. Installs in 30 seconds.
Why restic and not rsync or plain tar? Restic deduplicates at the block level. If a file hasn’t changed, it isn’t copied again. That saves space and time. Restic encrypts everything client-side before sending it anywhere, so even if the backup sits on a server you don’t fully trust, your data is protected. Restic handles snapshot rotation with flexible rules: keep 7 daily, 4 weekly, 6 monthly, everything else gets removed automatically. And most importantly, restic lets you check repository integrity with one command and restore a specific file or folder without unpacking the whole archive.
sudo apt install restic -y
restic version
Initialize a repository (say, on an external drive or at /mnt/backup):
export RESTIC_PASSWORD="StrongPassword-remember-it"
restic init --repo /mnt/backup/homelab
First backup of important data:
restic backup \
  /home \
  /etc \
  /opt/docker-compose \
  --repo /mnt/backup/homelab \
  --exclude="/home/*/.cache" \
  --exclude="/home/*/.local/share/Trash"
Check that the backup actually contains files:
restic snapshots --repo /mnt/backup/homelab
restic ls latest --repo /mnt/backup/homelab | head -30
This is a critical step. The restic ls command shows the contents of the latest snapshot. If files show up there, the backup works.
What to back up on a Docker server
| What | Path | Why it matters |
|---|---|---|
| Docker Compose files | /opt/stacks/ or /home/user/docker/ | All service configuration |
| Named volumes | /var/lib/docker/volumes/ | Database data, Nextcloud, etc. |
| System configs | /etc/ | Network, firewall, cron, systemd units |
| Home directories | /home/ | SSH keys, .env files, scripts |
| Certs and secrets | /etc/letsencrypt/, /opt/secrets/ | Without these, services won’t come up |
Automation and rotation
sudo nano /opt/scripts/backup.sh
#!/bin/bash

export RESTIC_REPOSITORY="/mnt/backup/homelab"
export RESTIC_PASSWORD="StrongPassword"

LOG="/var/log/restic-backup.log"
DATE=$(date '+%Y-%m-%d %H:%M:%S')

echo "[$DATE] Starting backup..." >> $LOG

# Stop DB containers before backup
docker stop nextcloud_db 2>/dev/null

# The actual backup
restic backup \
  /home \
  /etc \
  /opt \
  /var/lib/docker/volumes \
  --exclude="/var/lib/docker/volumes/*/_data/cache" \
  >> $LOG 2>&1

RESULT=$?

# Start it back up
docker start nextcloud_db 2>/dev/null

# Remove old snapshots: keep 7 daily, 4 weekly, 6 monthly
restic forget \
  --keep-daily 7 \
  --keep-weekly 4 \
  --keep-monthly 6 \
  --prune \
  >> $LOG 2>&1

if [ $RESULT -eq 0 ]; then
  echo "[$DATE] Backup completed successfully" >> $LOG
else
  echo "[$DATE] BACKUP FAILED with code $RESULT" >> $LOG
fi
chmod +x /opt/scripts/backup.sh

# Add to cron
sudo crontab -e
# Backup every night at 2:00
0 2 * * * /opt/scripts/backup.sh
Problem four: a UPS with the wrong sine wave
Why a cheap UPS is worse than no UPS at all
You buy a UPS to protect the server from power outages. Makes sense. But most budget UPS units (under $60-70) output a stepped approximation instead of a clean sine wave when switching to battery. Looks similar, but for modern power supplies with active PFC it’s a real problem.
Power supplies with active PFC (that’s 90% of modern ATX units) aren’t designed for stepped approximation input. Best case, the PSU starts overheating and protection kicks in, shutting the server down right when the power went out. Worst case, the PSU fails after a few months of this.
Check your UPS: the spec sheet should say “pure sine wave.” If it says “simulated,” “stepped,” or nothing at all, it’s not suitable for a server with a normal PSU.
| Output waveform type | Suitable for a server | Approximate price |
|---|---|---|
| Pure Sine Wave | Yes, no restrictions | from $100 |
| Stepped approximation | No (for PSUs with active PFC) | $25-60 |
| Offline UPS without AVR | No (voltage sags) | up to $40 |
For a home server, the minimum is a line-interactive UPS with a pure sine wave and a USB port for proper shutdown when the battery runs low. APC Back-UPS Pro and CyberPower CP1500PFCLCD are among the proven options.
Set up auto shutdown via apcupsd or NUT
A UPS with no integration into the system is just an expensive extension cord with a battery. The whole point is to have the server shut down cleanly when the battery drains.
For APC over USB:
sudo apt install apcupsd -y
sudo nano /etc/apcupsd/apcupsd.conf
UPSNAME homeserver
UPSCABLE usb
UPSTYPE usb
DEVICE
MINUTES 5
TIMEOUT 0
BATTERYLEVEL 30
sudo systemctl enable apcupsd
sudo systemctl start apcupsd
apcaccess status
The MINUTES 5 parameter means: start a clean shutdown if the battery runtime estimate drops below 5 minutes. BATTERYLEVEL 30 means: shut down if the charge drops below 30%. Both conditions are checked with OR, whichever happens first.
For other UPS brands (Ippon, Eaton, Powerware), look at Network UPS Tools (NUT), it supports pretty much anything that connects via USB or SNMP.
Problem five: containers broke after an update
Auto-update without thinking
Watchtower, Diun, a manual docker pull on a schedule, all these tools do one thing: update container images. The problem is that a new image version isn’t always compatible with your current data or configuration. This hits databases and Nextcloud especially hard.
PostgreSQL 15 won’t read PostgreSQL 14 data without an explicit migration. Nextcloud requires sequential version upgrades. If auto-update jumped across a major version, the container won’t start, and the data is intact but inaccessible.
Diagnosis steps when a container won’t come up:
# Check status of all containers
docker ps -a

# Check the problem container's log
docker logs container_name --tail 50

# Check Docker events
docker events --since 1h --until now
Typical errors after an update and what to do about them:
| Message in logs | Cause | Fix |
|---|---|---|
| database files are incompatible with server | Major PostgreSQL upgrade | Roll back the image, run pg_dump, migrate |
| Nextcloud is in maintenance mode | Update didn’t finish migration | docker exec -u www-data nextcloud php occ upgrade |
| exec /entrypoint.sh: exec format error | Image built for a different architecture | Specify an explicit platform tag in compose |
| Permission denied on volume | New version changed the user’s UID | chown -R new_uid:gid /path/to/volume |
How to update without the risk
A working scheme for a homelab: back up the volume before updating, then update, then verify. You can’t make this fully safe to automate, only manual or with a pause for checking.
Watchtower in fully automatic mode for image updates is convenient for stateless services. For services with databases, file storage, or complex configuration, use notifications only, and do the update by hand. Diun (Docker Image Update Notifier) handles monitoring well: it sends notifications when a new image appears, without touching the containers themselves.
Nextcloud updates need special attention. You can’t skip major versions, only sequential. Jumping from 25 to 27 directly won’t work, you need to go through 26. This is a Nextcloud quirk, and it shows up painfully when Watchtower auto-updated the image through several versions while you weren’t watching the server.
# Note the current image version
docker inspect container_name | grep Image

# Back up the volume before updating
docker run --rm \
  -v volume_name:/data \
  -v /tmp/backup:/backup \
  alpine tar czf /backup/volume-backup-$(date +%Y%m%d).tar.gz /data

# Update the image
docker pull image:tag
docker compose up -d service_name

# Check that the service is alive
docker logs container_name --tail 20
curl -s http://localhost:port/health
If something went wrong, roll back by pinning the version in docker-compose.yml:
services:
  postgres:
    image: postgres:15.6  # explicit tag, not :latest
A specific tag instead of :latest is the only way to control exactly what gets deployed. With :latest you never know what got pulled after a docker pull.
Storage architecture: get it right from the start
Don’t trust a single disk
Typical homelab setup: one SSD with the OS, Docker, data, and backups all on it. That’s not a setup, that’s a time bomb. When the disk dies, everything dies with it: OS, containers, data, and every backup you wrote there.
A reasonable minimal scheme for a home server looks different:
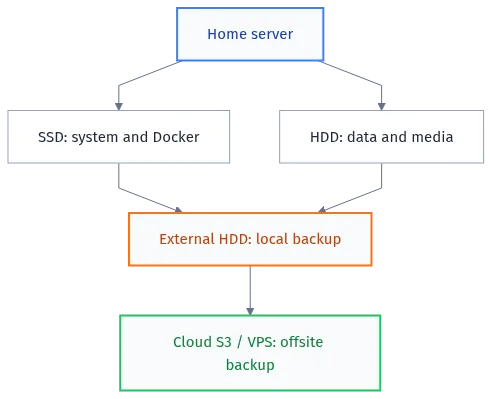
The SSD handles speed: the system, /var/lib/docker, databases. The HDD handles volume: media files, archives, backups. Splitting roles between disks lowers the load on the SSD and gives you a clear redundancy scheme.
Partition it right from day one
If you’re just setting up the server, do it right from the start. Repartitioning later without a full reinstall is painful.
| Partition | Size | Purpose |
|---|---|---|
| / | 50-80 GB | OS, system packages |
| /var | 100-200 GB | Docker, logs, journald |
| /home | remaining SSD space | Configs, scripts, compose files |
| /mnt/data | entire HDD | Media, files, backups |
A separate partition for /var matters because that’s exactly where Docker and journald write. If /var fills up, the system stays functional, Docker just starts complaining. If / fills up, things are much worse, up to and including a kernel panic.
You can mount /var/lib/docker on a separate disk after installation too, via symlink or mount –bind, but it’s better to plan for it upfront.
# Check current partitioning and usage
lsblk
df -h
# See what's writing to disk right now
sudo iotop -o -d 3
Security quietly degrades over a year
What happens while the server just runs
You set it up, configured it, forgot about it. A year later it turns out: SSH still accepts password authentication, fail2ban is running but you never added a rule for the Nextcloud port, UFW is open to the whole subnet because “it was more convenient at the time.” This isn’t a disaster, but it’s a gradual lowering of the security bar that accumulates unnoticed.
A quick check of the current state:
# SSH: what's allowed
sudo grep -E "PasswordAuthentication|PermitRootLogin|Port" /etc/ssh/sshd_config

# UFW: what's open
sudo ufw status verbose

# Fail2ban: active rules and stats
sudo fail2ban-client status
sudo fail2ban-client status sshd

# Recent failed login attempts
sudo lastb | head -20

# Active sessions
who -a
What should be in /etc/ssh/sshd_config on a server exposed to the internet or to a local network with Wi-Fi guests:
PasswordAuthentication no
PermitRootLogin no
Port 22222
MaxAuthTries 3
ClientAliveInterval 300
ClientAliveCountMax 2
AllowUsers your_username
sudo systemctl restart sshd
UFW: a minimal firewall without paranoia
# Base setup
sudo ufw default deny incoming
sudo ufw default allow outgoing

# Allow only what's needed
sudo ufw allow 22222/tcp    # SSH on a non-standard port
sudo ufw allow 80/tcp       # HTTP
sudo ufw allow 443/tcp      # HTTPS
sudo ufw allow 51820/udp    # WireGuard if you use it

# Enable
sudo ufw enable
sudo ufw status numbered
For services that should only be reachable from the local network, restrict by subnet:
# Nextcloud, local network only
sudo ufw allow from 192.168.1.0/24 to any port 8080

# Portainer, only from your IP
sudo ufw allow from 192.168.1.10 to any port 9443
Automatic security updates
Updating by hand once a month is a good habit. But security patches come out continuously, and a critical vulnerability can show up between your update sessions. For a homelab the reasonable compromise is automatic updates for security packages only, everything else by hand.
sudo apt install unattended-upgrades -y
sudo dpkg-reconfigure --priority=low unattended-upgrades
This enables automatic installation of packages from the security.ubuntu.com or debian-security repository. Major upgrades and Docker images are still manual.
Networking: what quietly degrades
DNS resolver on a home server
Plenty of people put AdGuard Home or Pi-hole on a home server on day one. Then six months later they discover: DNS stopped responding and literally nothing works on the home network, because every device points at this server. The cause: a full disk, a crashed container, and nobody noticed until someone at home started complaining the internet “isn’t working.”
For DNS services that affect the whole network, monitoring is mandatory. Minimum: an availability check once a minute via cron or a healthcheck in docker-compose.
services:
  adguardhome:
    image: adguard/adguardhome:latest
    healthcheck:
      test: ["CMD", "wget", "-q", "--spider", "http://localhost:3000"]
      interval: 60s
      timeout: 10s
      retries: 3
      start_period: 30s
    restart: unless-stopped
The restart: unless-stopped parameter instead of always is an important distinction. With always, the container restarts even if you stopped it manually for maintenance. With unless-stopped, it restarts after a crash and on system boot, but not if explicitly stopped.
WireGuard: checking the tunnel
WireGuard quietly drops the connection if there’s no traffic and no keepalive configured. After a few hours of inactivity the tunnel “freezes”: ping goes through, but the first packets get lost until key re-negotiation happens. In practice this looks like “VPN sometimes doesn’t work” with no obvious cause.
# Check the state of all tunnels
sudo wg show

# Check the latest handshake (seconds since now)
sudo wg show wg0 latest-handshakes
If latest-handshake is more than 3-5 minutes old during active use, the tunnel is stuck. Add to the peer config:
[Peer]
PersistentKeepalive = 25
This sends a keepalive every 25 seconds and keeps the tunnel from freezing. Especially important if WireGuard is used for remote access to the homelab: without this, the connection drops after a few minutes of inactivity.
Upgrading the OS: when and how
Major distro upgrades are a separate story
Ubuntu 22.04 -> 24.04, Debian 11 -> 12, this isn’t just apt upgrade. It’s a version change in Python, systemd, the kernel, and dozens of other components that can break something in your containers or system scripts. On production systems these upgrades come with a backup, staging tests, and a rollback window.
On a home server, the minimum is a full system backup before upgrading. The best time for a major distro upgrade: when you have an hour or two to verify everything works afterward, and when your last backup was yesterday, not three months ago.
# Before a major upgrade: full backup
restic backup / --exclude=/proc --exclude=/sys --exclude=/dev \
  --exclude=/tmp --exclude=/run \
  --repo /mnt/backup/homelab

# Verify the backup succeeded
restic snapshots --repo /mnt/backup/homelab | tail -3

# Only then: upgrade the distro
sudo do-release-upgrade
Proxmox: updates with and without a subscription
If you’re running Proxmox without an enterprise subscription, the default repository will keep trying to reach pve-enterprise.proxmox.com and complain about missing authorization. It doesn’t block anything, but it’s annoying. Switch to the no-subscription repository:
# Disable the enterprise repository
sudo sed -i 's/^deb/#deb/g' /etc/apt/sources.list.d/pve-enterprise.list

# Add no-subscription
echo "deb http://download.proxmox.com/debian/pve bookworm pve-no-subscription" \
  | sudo tee /etc/apt/sources.list.d/pve-no-subscription.list

sudo apt update && sudo apt upgrade -y
The no-subscription repository has the same packages as enterprise, just with a slight delay. Completely fine for a home server.
Power and thermals: what slowly kills the hardware
Overheating: the silent killer
A home server often sits in a closet, under a desk, or in a storage room. In summer, ambient temperature rises 5-10 degrees. Ventilation that was enough in winter stops keeping up. The CPU starts throttling, disks heat up, and the system slows down for no obvious reason.
Check current temperatures:
sudo apt install lm-sensors smartmontools -y
sudo sensors-detect --auto
sensors
sudo smartctl -A /dev/sda | grep -i temp
sudo smartctl -a /dev/nvme0 | grep -i temp
Normal operating temperatures for a home server at idle:
| Component | Normal | Worth checking | Critical |
|---|---|---|---|
| CPU (idle) | 30-50°C | above 70°C | above 90°C |
| SATA SSD | 25-45°C | above 60°C | above 70°C |
| NVMe SSD | 35-55°C | above 70°C | above 85°C |
| HDD | 25-40°C | above 50°C | above 60°C |
If an NVMe drive regularly runs above 70°C, that accelerates wear and causes read errors. A heatsink for NVMe costs a few dollars and takes five minutes to install. One of the best investments for a home server.
Power consumption and hardware choice
A home server runs 24/7. An extra 10W of draw works out to 87.6 kWh a year, roughly $10-15 at current rates. The difference between an Intel N100 (6-10W) and an old Core i7 (65W+) at idle is a difference of $40-60 a year in electricity. Plus heat output, plus cooling noise.
Enable aggressive CPU power saving if the server isn’t constantly doing heavy compute:
sudo apt install linux-cpupower -y
sudo cpupower frequency-set -g powersave
# Make it persistent
echo 'GOVERNOR="powersave"' | sudo tee /etc/default/cpupower
sudo systemctl enable cpupower
Containers: what goes wrong after a year
Orphan volumes pile up unnoticed
Every time you remove a container with docker rm or docker compose down without the -v flag, the named volume stays behind. If you later recreate the container with a different volume name, the old one sits there as garbage. After a year, these “orphans” can add up to several gigabytes.
# Find volumes not attached to any container
docker volume ls -f dangling=true

# Check size via system df
docker system df -v
Good practice: give volumes explicit names in docker-compose.yml, it’s easier to figure out what can be deleted:
volumes:
  nextcloud_data:
    name: nextcloud_data
  nextcloud_db:
    name: nextcloud_db
  portainer_data:
    name: portainer_data
With explicit names, docker volume ls shows a clear list instead of UUID hashes. And it’s obvious at a glance: this volume is needed, that unrecognizable hash hasn’t been used in six months.
A container hangs and ignores stop
A rare but unpleasant situation: docker stop container waits 10 seconds, sends SIGKILL, and the container still doesn’t respond. Usually this means the process is stuck in uninterruptible sleep: waiting on I/O to a disk that stopped responding, or a kernel deadlock.
# Get the process PID on the host
docker inspect container_name --format '{{.State.Pid}}'

# Check dmesg for disk errors
sudo dmesg | tail -50 | grep -iE "error|fault|hung_task"

# Force termination
docker kill --signal=9 container_name
If a container hung because of disk issues, check SMART data immediately. I/O hangs often precede a full drive failure by days or weeks.
Document your infrastructure
A year later you don’t remember why you set this up
This sounds like advice from a first-year student’s textbook, but in practice, a year later you look at your own crontab and don’t understand what the check2.sh script running at 4:17 does. Or you find an open port in UFW and don’t remember why you opened it six months ago. Maybe you opened it for something temporary, finished the task, and forgot to close the port.
Minimal documentation that actually saves you:
- README.md in the compose-files folder: what’s running, why, how to restart it
- Comments in crontab before each task:
# Weekly SSD wear check - A single changelog file: date, what changed, why
- Git for configs: change history and the ability to roll back
cd /opt/stacks
git init
git add .
git commit -m "initial: base stack after first setup"

# After each significant change
git add docker-compose.yml
git commit -m "nextcloud: upgraded to 28.0.1, added redis"
You don’t need GitHub or GitLab, a local repository is enough. What matters is having history and being able to run git diff HEAD~1 when something stops working after a config edit. Saves your nerves at 3 AM.
Security quietly degrades over a year
What happens while the server just runs
You set it up, configured it, forgot about it. A year later it turns out: SSH still accepts password authentication, fail2ban is running but you never added a rule for the Nextcloud port, UFW is open to the whole subnet because “it was more convenient during setup.” Not a disaster today, but a gradual lowering of the security bar that accumulates unnoticed.
A quick check of the current state:
# SSH: what's allowed
sudo grep -E "PasswordAuthentication|PermitRootLogin|Port" /etc/ssh/sshd_config

# UFW: what's open
sudo ufw status verbose

# Fail2ban: active rules
sudo fail2ban-client status

# Recent failed SSH login attempts
sudo lastb | head -20
What should be in /etc/ssh/sshd_config on a server reachable from outside or from a guest Wi-Fi network:
PasswordAuthentication no
PermitRootLogin no
MaxAuthTries 3
AllowUsers your_username
sudo systemctl restart sshd
UFW: a minimal firewall
Base setup that closes off anything unnecessary:
sudo ufw default deny incoming
sudo ufw default allow outgoing
sudo ufw allow 22/tcp
sudo ufw allow 80/tcp
sudo ufw allow 443/tcp
sudo ufw allow 51820/udp  # WireGuard
sudo ufw enable
sudo ufw status numbered
For services that should only be reachable from the local network, restrict by subnet:
# Portainer, local network only
sudo ufw allow from 192.168.1.0/24 to any port 9443

# Prometheus, only from a specific IP
sudo ufw allow from 192.168.1.10 to any port 9090
System requirements
| Component | Minimum | Recommended | Current version |
|---|---|---|---|
| OS | Ubuntu 22.04 LTS / Debian 11 | Ubuntu 24.04 LTS / Debian 12 | Ubuntu 24.04.2 / Debian 12.6 |
| Docker Engine | 24.x | 26.x and above | 27.x |
| Docker Compose | v2.15 | v2.24+ | v2.27+ |
| smartmontools | 7.2 | 7.4 | 7.4 |
| restic | 0.14 | 0.16+ | 0.17.x |
| Proxmox VE | 7.x | 8.x | 8.2 |
The versions above are current as of publication. Before installing or upgrading, check the latest releases on the official pages, especially for Docker and restic, since they update often.
Monitoring: know before it breaks
A minimal stack, no over-engineering
A homelab doesn’t need Prometheus + Grafana + Alertmanager. You need to get notified when a disk hits 85% full, a container dies, or an SSD starts throwing warnings. Three tools handle that.
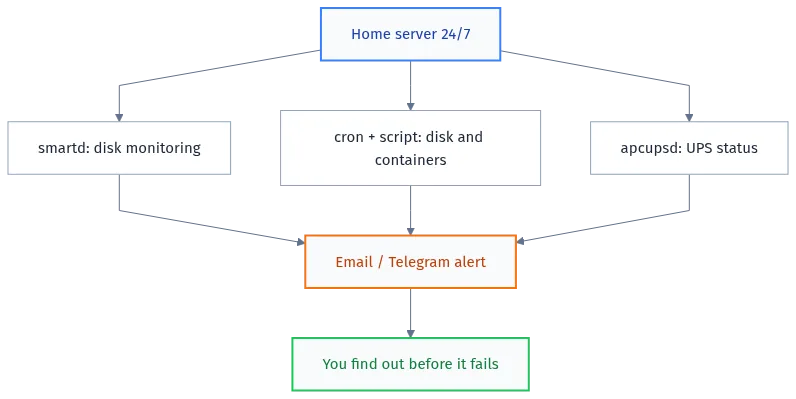
Smartd is already part of the smartmontools package. Set it up to automatically check disks and notify on problems:
sudo nano /etc/smartd.conf
# Monitor all disks, short test once a day, long test once a week
DEVICESCAN -a -o on -S on -n standby,q \
  -s (S/../.././02|L/../../6/03) \
  -W 4,45,50 \
  -m root -M exec /usr/share/smartmontools/smartd-runner
sudo systemctl enable smartd
sudo systemctl restart smartd
A simple disk and container monitoring script that writes to the system log (or adapt it for a Telegram webhook):
#!/bin/bash
# /opt/scripts/check-health.sh

THRESHOLD_DISK=85

# Check disk usage
DISK_USAGE=$(df / | tail -1 | awk '{print $5}' | tr -d '%')
if [ "$DISK_USAGE" -gt "$THRESHOLD_DISK" ]; then
  logger -t homelab-check "WARNING: Root disk usage is ${DISK_USAGE}%"
fi

# Check Docker containers
STOPPED=$(docker ps -a --filter "status=exited" --format "{{.Names}}" | tr '\n' ' ')
if [ -n "$STOPPED" ]; then
  logger -t homelab-check "WARNING: Stopped containers: $STOPPED"
fi

# Check SSD wear (Kingston/Intel)
SSD_LIFE=$(sudo smartctl -A /dev/sda | grep -E "SSD_Life_Left|Media_Wearout" | awk '{print $4}' | head -1)
if [ -n "$SSD_LIFE" ] && [ "$SSD_LIFE" -lt 70 ]; then
  logger -t homelab-check "WARNING: SSD life remaining: ${SSD_LIFE}%"
fi
chmod +x /opt/scripts/check-health.sh

# Run every hour
echo "0 * * * * /opt/scripts/check-health.sh" | sudo crontab -
Script results show up in sudo journalctl -t homelab-check. If you want Telegram, swap logger for curl against the bot API, that’s 10 minutes of work.
Maintenance: what to do once a quarter
Monthly tasks
Once a month, it takes 15-20 minutes. That’s the minimum that keeps problems from building up to a critical level. Updating the system and packages is the first thing worth doing regularly. Not major distro upgrades, just apt update && apt upgrade. This closes security holes that show up constantly, and updates tools like smartmontools and restic.
sudo apt update
sudo apt upgrade -y
sudo apt autoremove -y
Checking logs for errors takes two minutes but can reveal a problem building up unnoticed:
sudo journalctl -p err --since "1 month ago" | tail -50
sudo dmesg | grep -iE "error|fail|bad sector" | tail -20
Quarterly tasks
Spending an hour once a quarter is a lot better than recovering a server after an incident.
| Task | Command | Frequency |
|---|---|---|
| Check SSD wear | smartctl -A /dev/sda | Quarterly |
| Verify backup | restic snapshots && restic check | Monthly |
| Test restore | restic restore latest –target /tmp/restore-test | Quarterly |
| Clean up Docker | docker system prune -f | Monthly (or cron) |
| Check UPS battery | apcaccess status | grep BCHARGE | Quarterly |
| Update system | apt update && apt upgrade | Monthly |
| Check error logs | journalctl -p err –since “1 month ago” | Monthly |
A separate note on testing restores from backup. A lot of people run backups for years and never check whether they can actually restore from one. Call it Schrödinger’s backup: it both works and doesn’t until you check it. Check it. At least one random file, once a quarter.
Troubleshooting: symptom, diagnosis, fix
| Symptom | Diagnosis | Diagnostic command | Fix |
|---|---|---|---|
| Disk at 100%, server lagging | Docker logs or journald | du -sh /var/lib/docker/* && journalctl –disk-usage | docker system prune -f + vacuum journald |
| Container won’t start after update | Data or image incompatibility | docker logs name –tail 50 | Roll back to the previous image tag |
| Server shuts down on power loss | UPS with simulated sine wave | apcaccess status | Replace with a Pure Sine Wave UPS |
| SSD suddenly read-only | Critical wear indicator, drive switched to read-only | smartctl -a /dev/sda | Urgent drive replacement, restore from backup |
| Backup script silent, cron runs fine | Silent error | cat /var/log/restic-backup.log | Add exit code checks and notifications |
| Docker taking up space, prune doesn’t help | Named volumes without services | docker volume ls -f dangling=true | docker volume prune (careful!) |
| High write I/O with no obvious cause | journald or a container with debug logging | sudo iotop -o | Limit journald and set up Docker log rotation |
Distro upgrade: when and how to do it without losses
Major upgrades aren’t routine
Ubuntu 22.04 to 24.04, Debian 11 to 12, this isn’t just apt upgrade. It’s a version change in Python, systemd, libraries, and compilers, affecting anything built from source or dependent on system libraries. On a home server running Docker, most services are isolated in containers and survive the upgrade fine. But system scripts, cron jobs, and anything written in Python tied to a specific version can break.
The right sequence before a major distro upgrade:
- Make a full backup, not just data, but the system partition too
- Note down the current versions of all Docker container images
- Check that the new distro version is compatible with your current Docker version
- Make sure you have 30-60 minutes to verify things afterward
# Note down current container versions
docker ps --format "table {{.Names}}\t{{.Image}}" > /root/containers-before-upgrade.txt

# Full system backup (not just /home and /etc)
restic backup / \
  --exclude=/proc --exclude=/sys --exclude=/dev \
  --exclude=/tmp --exclude=/run --exclude=/var/run \
  --repo /mnt/backup/homelab-system \
  --tag "pre-upgrade-$(date +%Y%m%d)"

# Verify the backup succeeded
restic snapshots --repo /mnt/backup/homelab-system | tail -3

# Only now: the upgrade
sudo do-release-upgrade
After the upgrade, check right away: Docker started, all containers came up, UFW rules are still in place, crontab isn’t empty. Takes 5 minutes and immediately shows what broke if something went wrong.
Proxmox without an enterprise subscription
If you run Proxmox without a paid subscription, the default repository will constantly complain about missing authorization against pve-enterprise.proxmox.com. It doesn’t block anything, but it’s annoying on every apt update. Switch to the no-subscription repository:
# Disable the enterprise repository
sudo sed -i 's/^deb/#deb/g' /etc/apt/sources.list.d/pve-enterprise.list

# Add no-subscription (swap bookworm for your version if needed)
echo "deb http://download.proxmox.com/debian/pve bookworm pve-no-subscription" \
  | sudo tee /etc/apt/sources.list.d/pve-no-subscription.list

sudo apt update && sudo apt upgrade -y
The no-subscription repository has the same packages as enterprise, just with a slight delay after release. Completely fine for a home server.
WireGuard on a home server: a typical problem after a year
The tunnel “freezes” when idle
WireGuard is a minimalist protocol. It doesn’t actively maintain a connection, it just encrypts and forwards packets when there are any. If there’s no traffic for a few minutes, the NAT on the ISP’s router or your home router forgets the port mapping. The next packet through the tunnel gets lost until a new handshake happens.
In practice this looks like: the VPN “works,” but the first seconds after a pause drop packets. An SSH session over WireGuard hangs after a few minutes of inactivity. Ping goes through but with losses after a pause.
Fixed with one line in the config:
[Peer]
PublicKey = ...
AllowedIPs = ...
Endpoint = ...
PersistentKeepalive = 25
PersistentKeepalive = 25 means: send a keepalive packet every 25 seconds even with no traffic. This keeps the NAT mapping alive and stops the tunnel from freezing. You only need to add it on the client side behind NAT, a server with a public IP usually doesn’t need it.
# Check the latest handshake (age in seconds)
sudo wg show wg0 latest-handshakes

# Restart the interface after a config change
sudo systemctl restart wg-quick@wg0
sudo wg show
After adding PersistentKeepalive, latest-handshake should update roughly every 25 seconds even with no active traffic.
Autostart WireGuard via systemd
After rebooting the server, WireGuard should come up automatically. If you used wg-quick, set it up like this:
sudo systemctl enable wg-quick@wg0
sudo systemctl status wg-quick@wg0
If WireGuard runs inside Docker, make sure the container has restart: unless-stopped and that the Docker daemon starts on boot:
sudo systemctl enable docker
sudo systemctl is-enabled docker
FAQ
How do I check SSD wear on a home server?
Install smartmontools with sudo apt install smartmontools, then run sudo smartctl -A /dev/sda. Look for the SSD_Life_Left (ID 231), Wear_Leveling_Count (ID 177), or Media_Wearout_Indicator (ID 233) attributes, the specific attribute depends on the manufacturer. For an NVMe drive: sudo smartctl -a /dev/nvme0 | grep "Percentage Used". If remaining life is below 70-80%, plan to replace the drive in the coming months.
Why did Docker fill up the whole disk on my server?
Usually it’s JSON container logs in /var/lib/docker/containers/ and leftover images from updates. Run docker system df to see exactly what’s taking up space, and docker system prune -f for safe cleanup. To stop it from happening again, set log limits in /etc/docker/daemon.json via the max-size and max-file parameters.
What kind of UPS do I need for a home server?
You need a line-interactive UPS with a pure sine wave, this is critical for modern power supplies with active PFC. Budget UPS units with stepped approximation aren’t suitable and can damage the PSU when switching to battery. A USB port is mandatory for integration with apcupsd or NUT, so the server shuts down cleanly when the battery runs low.
How do I know if my backup actually works?
Run restic snapshots to confirm snapshots are being created, and restic check to verify repository integrity. Once a quarter do a test restore: restic restore latest --target /tmp/restore-test and check the files are there. A backup that’s never been tested for restore is potentially an empty backup.
What breaks first on a home server after a year?
In practice, the first thing to break isn’t hardware, it’s configuration. The disk fills up because of unlimited Docker logs, backups stop working because of silent errors in the script, or a container won’t start after an auto-updated image. On the hardware side, the most common findings after a year are unexpected SSD wear and a UPS battery that no longer holds its rated runtime.
How do I set up automatic Docker cleanup?
Add a safe weekly cleanup to crontab: 0 3 * * 0 /usr/bin/docker system prune -f. This removes stopped containers, dangling images, and build cache every Sunday at 3:00, without touching running services or their data. In parallel, set log limits in daemon.json to prevent accumulation.
Why does WireGuard stop working after a few minutes of inactivity?
It’s a NAT problem, the ISP’s router or your home router forgets the UDP port mapping when there’s no traffic. Add PersistentKeepalive = 25 to the peer config, this sends a keepalive every 25 seconds and keeps the connection alive. Restart the interface with sudo systemctl restart wg-quick@wg0 after changing the config.
My server doesn’t shut down cleanly on power loss, what do I check?
Check three things: first, whether apcupsd or NUT is installed and connected to the UPS over USB. Run apcaccess status, if it errors out, the USB connection isn’t configured. Second, check that apcupsd’s config has sane BATTERIES and MINUTES values. Third, make sure the UPS output waveform is compatible with the PSU, a simulated sine wave can cause erratic behavior when switching to battery.
Bottom line
A home server a year in isn’t the same machine you set up. Disks write constantly, Docker piles up garbage, backups break quietly, a UPS that looked fine on paper doesn’t deliver what you expected. All of it is predictable and diagnosable with the commands in this article.
The main lesson of year one: a home server needs maintenance. Not complicated, not constant, but regular. Check logs once a month, run smartctl once a quarter, restore a file from backup. That’s half an hour a month against several hours of recovery after an incident.
Second lesson: automation without oversight doesn’t work. A cron job that silently fails for three months looks exactly like a cron job that works fine. A backup script with no exit code check and no notifications is an illusion of safety, not safety. Every automated task should either finish successfully with a log entry, or clearly report an error.
Third lesson: cutting corners costs more later. A UPS that costs next to nothing and kills your PSU. A disk with no SMART monitoring that dies without warning. A backup on the same disk as the data. This isn’t paranoia, it’s just understanding that hardware fails, and the only question is whether you notice before you lose data.
If you’re looking at your server right now, running for over a year with zero maintenance, that’s a good sign the hardware is reliable. But it doesn’t mean there are no problems. Run smartctl, check docker system df, verify your latest backup. You’ll probably find something interesting. Better now, while you have time to deal with it calmly.
The tools for this are simple: smartmontools, restic, cron, ufw, all already in any standard repository. Nothing exotic. A few hours of setup get you a server you can leave running without dreading what you’ll find when you check back.
Three things to do right now: check SSD wear with smartctl, run docker system df and look at the numbers, and restore one file from your latest backup. Not tomorrow. Now. If any of this is broken, better to find out calmly than at 3 AM.

Author: Андрей А.
Оставайтесь на связи
Рецепты от IT-боли. Без воды, без рекламы, без маркетинговой шелухи.
Подписаться на IT-Аптеку →

У меня домашний кластер из трёх нод Proxmox с Ceph, и история с износом SSD выглядит иначе. Когда данные реплицируются между нодами, каждый write превращается в несколько. Плюс Ceph пишет журналы OSD на отдельный диск. Итог: серверные SSD с PLP держат нагрузку, а вот consumer-диски в OSD мрут за полгода, причём SMART часто показывает всё ещё приличный Life_Left, а контроллер уже уходит в read-only. Ещё заметил, что при миграции VM снапшоты и репликация дают всплески записи, которые iotop не всегда ловит, потому что они на уровне ядра. Вопрос: как ты считаешь бюджет TBW для кластера и что делать с журналами Ceph, чтобы не убить диск за год?
Про Ceph тема отдельная, и там арифметика жёстче. Один write при репликации 3x даёт три записи на OSD, плюс журнал, который по умолчанию пишется на тот же диск, если не вынесен на NVMe. У меня для расчёта TBW есть простая формула: суточный объём записи на OSD из ceph -s и iostat, умножаешь на 365, и получаешь годовое потребление. Для DB/WAL рекомендую выделять отдельный NVMe с PLP, иначе consumer-диск в журнале уйдёт в read-only раньше, чем SMART покажет износ. По журналам: в Quincy и новее можно переключить OSD на BlueStore с отдельными DB/WAL, а ещё уменьшить размер журнала через osd_journal_size и включить bdev_flush. Проверять износ лучше не через Life_Left, а через nvme smart-log в поле Percentage Used и Media Errors, потому что у некоторых контроллеров Life_Left врёт при интенсивной записи. Если хочешь, могу расписать, как я считаю бюджет TBW для трёх нод с репликацией и как распределяю DB/WAL, чтобы не покупать серверные диски каждый год.
Словил похожее, только с логами systemd-journal: после переноса сервера в кладовку он стал писать в разы больше. Виновата оказалась вибрация от стиральной машины этажом ниже. Диск начал часто перечитывать сектора, и журнал забил весь раздел за пару месяцев. Помогло ограничение размера и перенос журнала на отдельный дешёвый SSD. Стало интересно: почему вибрация так влияет на запись, если механических частей в SSD нет? И как проверить, что накопитель не начал деградировать из-за подобных условий, кроме стандартных SMART-атрибутов?
Вибрация на SSD напрямую не влияет, но через неё может страдать контакт SATA или питания: микропропадания вызывают сбросы контроллера, и он перезаписывает буфер. Это редкость, чаще причина в другом. Проверьте через smartctl -a поле CRC_Error_Count и UDMA_CRC_Error_Count. Рост этих счётчиков говорит о проблемах с кабелем или разъёмом, а не с ячейками памяти. Для вибрации проверьте крепление диска и кабели: они не должны болтаться. Ещё вариант: питание по SATA может просаживаться от вибрации, если БП дешёвый. Тогда смотрите Retired_Block_Count и Reallocated_Sector_Ct. Если они растут, диск лучше заменить. И да, перенос journald на отдельный SSD правильный шаг: снижает нагрузку на системный накопитель и упрощает диагностику.